You go in thinking, “Fix the ankle, do the work, get back to training.” Then the surgeon talks about 6–12 weeks of restrictions and your brain quietly screams. If you’re used to moving a lot, the early weeks after ankle surgery can feel less like recovery and more like being trapped in somebody else’s life.
This guide is for that gap. The part between “surgery day selfie” and “finally back to actual workouts,” where you’re dealing with swelling, crutches, weird sleep, and a constant fear you’re either doing too much or not nearly enough.
Table of Contents
The Big Picture: What the First 6 Weeks Are Really About
Let’s set expectations straight. The first six weeks are not about maxing out rehab or “earning” a faster comeback with more grind. They’re about not screwing up the repair.
Bones, ligaments, tendons, cartilage, they all have painfully slow, boring healing timelines. You can’t outwork biology. You can only support it or sabotage it.
Support looks like good pain and swelling control, following your weight-bearing restrictions, and doing the small, specific movements your surgeon or physio okays. Sabotage looks like “I feel pretty good, I’ll just put a bit more weight on it” a few hundred times a day.
If you want a really practical checklist style breakdown of ankle surgery recovery tips, things like pain control, swelling strategies, and how to move from non-weight-bearing to walking, resources like this ankle surgery recovery guide are worth bookmarking alongside whatever your surgeon gave you.
Quick note before we go into weeks: recovery looks different depending on what you had done (arthroscopy vs. fracture fixation vs. ligament repair vs. fusion vs. ankle replacement). Your surgeon’s protocol always wins. What follows is “typical patterns,” not a personal rehab plan.
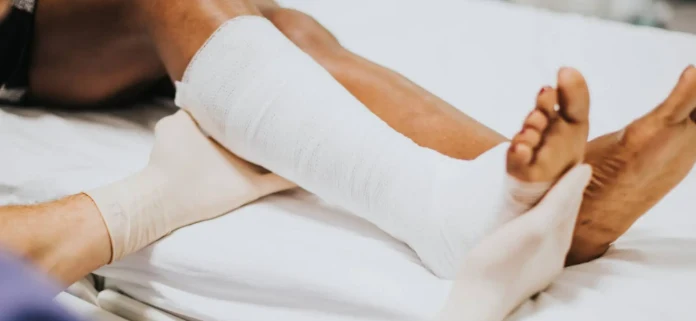
Days 0–7: The “Don’t Be a Hero” Phase
What’s Going On
- Fresh surgical trauma: bone, soft tissue, and nerves all irritated.
- Bandage, cast, or boot; sometimes a nerve block still wearing off.
- Strict non-weight-bearing (NWB) in most cases.
- Pain and swelling peaking in the first 48–72 hours.
Most active adults underestimate this phase. You’re used to pushing through discomfort, so you try to “tough out” pain or move around too much. That mindset works in the gym; it’s brutal for surgical healing.
What Usually Feels “Normal” This Week
- A deep, throbbing ache that spikes when your foot drops below heart level.
- Visible swelling and bruising around the ankle, sometimes up the shin or into the foot.
- Tightness around the incision or cast.
- Sleep being a mess, waking with throbbing or discomfort.
Normal doesn’t mean fun. It just means expected for this stage.
Red Flags You Don’t Ignore
- Fever or chills with increasing redness or warmth spreading from the incision.
- Severe, unrelenting pain that isn’t eased at all by meds, elevation, or ice.
- Calf pain or tightness with warmth, swelling, or tenderness (DVT concern).
- Soaked-through dressings with bright red bleeding.
Any of those? You call the surgeon’s office, or if it’s bad, you go to urgent care/ER. No “wait and see till Monday” nonsense.
Practical Moves This Week
- Elevation: Foot above heart level for big chunks of the day. Actually high, not on a tiny pillow.
- Icing: As cleared by your surgeon, usually 15–20 minutes at a time, several times per day, not directly on bare skin.
- Movement: If allowed, gentle toe wiggles or ankle pumps to help circulation. If your surgeon said absolutely no ankle motion, you listen.
- Non-weight-bearing skills: Learn crutch technique properly, especially stairs and bathroom transfers. Your pride can sit this one out.
The goal is boring: protect the repair, manage pain and swelling, and figure out how to function on one working leg without breaking your neck.
Weeks 1–2: Settling Into the New Normal
The anesthesia fog fades, the narcotics get dialed down, and reality lands. You’re not going back to work “full-time by next week” like you told people. You’re still timing your day around meds, ice, and how far the bathroom is.
What You Can Usually Expect
- Pain: Often easing overall, with occasional spikes if you do too much or drop the leg for too long.
- Swelling: Still significant. It often balloons when you sit or stand and improves again with elevation.
- Mobility: Still NWB in most protocols, maybe brief standing only for transitions.
- Energy: You get wiped out fast. That’s normal, surgery is major stress.
Where Fitness People Get Into Trouble
The mental game gets louder here. You start worrying about muscle loss, weight gain, cardio slump. So you try to “make the most” of your good moments and suddenly you’re crutching laps around the house or doing aggressive upper-body circuits while sweating through your cast.
Your ankle doesn’t care how strong your shoulders are if all your swelling keeps blowing up. Swelling is not just annoying; persistent, unmanaged swelling delays healing and ramps up stiffness.
What You Can Usually Do Safely (If Cleared)
- Upper body training: Seated dumbbell or cable work for arms, shoulders, back, chest.
- Core work: Supine or seated core exercises that don’t load the operated leg.
- Hip and knee work on the uninjured side: Leg extensions, curls, glute bridges with the non-operated side fully bearing the load.
- Breathing and relaxation drills: Calm the nervous system; it helps pain.
General rule: If it forces you to stand, hop, balance, or hold your breath and brace like crazy, it’s probably not for Weeks 1–2.
Week 2–3: Follow-Up, Stitches Out, and Maybe a Boot
This is usually your first or second follow-up with the surgeon. You get wound and swelling checked, maybe X-rays if there was fracture fixation or fusion, and often a change in your protection setup.
What Often Changes Around This Time
- Sutures/staples removed: Incisions start looking less scary, more like actual scars-in-progress.
- Cast → boot (sometimes): You might move into a removable walking boot, which makes hygiene and certain exercises easier.
- Precise rules: Your surgeon might adjust your NWB time, or start talking about toe-touch or partial weight-bearing dates.
This is also when many surgeons give the formal OK to start physiotherapy, especially for arthroscopy, ligament repairs, and some fracture cases.
What a First Physio Session Usually Looks Like
- History: What surgery you had, how it happened, current symptoms, your goals (yes, “I want to get back to running” is valid).
- Check: Swelling, incision area (without messing with the wound), basic joint and muscle status above and below the ankle.
- Education: “Here’s what NWB really means,” “Here’s what you can do this week,” “Here’s what we’ll build toward.”
- Starter exercises: Gentle range-of-motion (if allowed), isometrics, circulation drills, and safe ways to move the rest of your body.
Good physios also help you plan your days so you’re not catching up with work, doing a full home workout, and trying to cook dinner on crutches, then wondering why your ankle looks like a balloon.
Weeks 3–4: The Tempting Middle Zone
This stretch can feel weird. You’re not “fresh post-op” anymore, but you’re also nowhere near normal. This is prime time for overdoing it because the pain dial is lower, and you start feeling a bit more human.
Pain and Swelling Around Week 3–4
- Pain is often intermittent: more tied to activity and position.
- Swelling ramps up when you sit with your foot down, stand, or crutch around a lot.
- Stiffness becomes more noticeable, especially first thing in the morning or after you’ve been still awhile.
Stiffness messes with active people more than pain sometimes. It feels like your ankle doesn’t belong to you anymore. That’s where early, controlled motion earns its keep.
Range of Motion and Early Loading (If Cleared)
Depending on surgery type and healing signs, your team might:
- Expand your ankle range-of-motion work, gentle dorsiflexion/plantarflexion, maybe some side-to-side movements in a controlled range.
- Introduce very light weight-bearing (toe-touch or a small percentage of body weight) in the boot with crutches.
- Start light strengthening of surrounding muscles, hip abductors, quads, hamstrings, calves (often isometric on the surgical side at first).
Key idea: just because you can put some weight down doesn’t mean you lean into it casually all day. Weight-bearing at this stage is usually a drill, not a lifestyle.
Safe Ways to Stay Active by Week 4
Again, this all assumes your surgeon and physio are on board.
- Upper body: You can usually progress intensity here: more load, more sets, more tempo work, as long as your position is safe and stable.
- Core and hips: Think dead bugs, bird dog variations (with care), side-lying hip work, glute bridges with the operated leg supported.
- Cardio options: Some people get cleared for a stationary bike with the boot on and low resistance. Others aren’t. You ask first.
Fitness-wise, you’re focused on “don’t lose everything” rather than “start building again.” Different mode. Still progress.
Weeks 4–6: From Pure Protection to Early Function
This is when things usually start to feel more encouraging. Not amazing, not normal, just less like survival mode. You might get the nod to move from strict NWB into more partial weight-bearing, or from partial into more sustained walking in the boot.
Understanding the Weight-Bearing Phases
Broad strokes, your surgeon or physio might talk about:
- Non-weight-bearing (NWB): Zero weight through the leg. Foot off the floor.
- Toe-touch weight-bearing (TTWB): Toes down only for balance, like there’s an egg under your foot you don’t want to crack.
- Partial weight-bearing (PWB): A percentage of your body weight, often progressed in stages.
- Full weight-bearing (FWB): All your weight through the leg, often still in a boot at first.
People mess this up constantly. They think “toe-touch” means “light stepping,” or “partial” means “I’ll just limp without crutches.” That’s how you overload healing tissue and stretch things that were carefully repaired.
What Progress Often Looks Like by Week 6
Typical, not guaranteed:
- Less constant pain; more soreness after busier days.
- Ongoing swelling, especially toward the evening or after more walking.
- Better confidence on crutches or with a cane (if you’re at that point).
- More active range-of-motion and gentle strengthening for your ankle.
You’re basically re-learning how to load the joint without asking it to absorb impact. Think “quiet walking and controlled exercises,” not jogging to catch the bus.
Sample “Fitness-Friendly” Week Around 4–6 (General Idea)
Assuming you’ve been cleared for some weight-bearing and stationary exercise:
- 3–4 days/week: Upper body and core strength (30–40 minutes).
- Daily: Physio-prescribed ankle ROM and strength drills (5–20 minutes spread through the day).
- 2–4 days/week: Short bouts of approved cardio (e.g., easy stationary bike, arm ergometer) if allowed.
- Every day: Elevation sessions and swelling checks, especially after activity.
You’re not training “hard”; you’re training “smart enough that your future self can train hard without regret.” Different game.
What’s Normal vs. Not So Normal in Weeks 1–6
Often Normal
- Swelling that increases with time on your feet and settles with elevation.
- Stiffness, especially in the morning or after sitting.
- Sharp twinges with certain movements as tissues wake up and nerves settle.
- Visible muscle loss in the calf by Week 4–6 (atrophy happens fast).
- Feeling more tired than you think you “should” be for small tasks.
Worth a Call to Your Surgeon or Physio
- Pain that’s steadily getting worse over several days instead of trending better.
- Sudden new deformity, locking, or “something shifted” feeling in the ankle.
- Worsening redness, heat, or drainage from the wound area.
- New numbness or tingling that doesn’t ease with position changes.
- Any sign that your weight-bearing increase made things sharply worse, not just “a bit sore.”
There’s a difference between “I did more, my ankle is kind of grumpy tonight” and “I did more, and now I can barely move it again.” First one, you dial back and monitor. Second one, you talk to someone.
Staying Sane When Your Identity Is “Active” but Your Ankle Isn’t
This part gets glossed over, but it wrecks people. You’re not just healing tissue, you’re also watching your routine, performance, and social life take a hit. That messes with your head.
Common Mental Traps
- All-or-nothing thinking: “If I can’t train properly, what’s the point?”
- Comparison: “So-and-so was walking without a boot by 4 weeks, what’s wrong with me?”
- Catastrophizing: “What if I never get back to my old level?”
None of those help you heal. They just make you either reckless or checked-out.
Better Ways to Play It
- Track small wins: First shower on your own, first day with less pain meds, first time doing stairs more smoothly. They count.
- Use mini-goals: “By Week 4 I want X degree of motion” (as set with your physio), “By Week 6 I want to tolerate Y minutes of approved cardio.”
- Stay connected: Show up at your gym or team environment in some way, watch practice, do your upper-body work there, talk to your coach.
The point isn’t pretending this is fun. It’s keeping you engaged enough that you don’t give up on the process when it feels slow and unfair.
What About Driving, Work, and Regular Life Stuff?
Driving
- Right ankle: You usually need to be off narcotic pain meds and able to do an emergency brake safely. That often means no driving for several weeks.
- Left ankle (automatic car): Sometimes cleared earlier, but only once you’re safe getting in/out of the car and managing pedals without distraction.
There are also legal and insurance aspects if you drive before being medically cleared and end up in an accident. That’s a real risk, not just paperwork.
Work
- Desk jobs: Some people go back part-time or remote within 1–2 weeks, especially if they can elevate their leg and take breaks.
- On-your-feet jobs: Retail, teaching, nursing, trades, these often need a much longer ramp or modified duties.
- Heavy physical work: Construction, warehouse jobs, first responders, expect a staged return, often well beyond the first 6 weeks.
Trying to “be tough” at work just usually shifts the stress onto your healing ankle. The joint doesn’t care if you’re the dependable one on the team.
Home Life
- Set up a “base camp” with everything within reach so you’re not crutching for every tiny task.
- Batch trips, if you’re going to the kitchen, bring what you need back for a few hours.
- Use whatever devices make life easier: shower chair, grab bars, backpack for carrying stuff on crutches, knee scooter if appropriate.
Think like an endurance athlete: conserve effort where it doesn’t matter so you have energy and swelling tolerance where it does.
Looking Past 6 Weeks: What You’re Actually Building Toward
Here’s the quiet reality: the first six weeks are setting the stage. They’re not the comeback. They’re the prequel that decides whether your comeback is clean or complicated.
After that window, the focus usually shifts more into:
- Stronger, more dynamic strengthening.
- Balance and proprioception work, getting your ankle to handle uneven surfaces again.
- Progressive cardio that doesn’t just “keep you alive” but actually rebuilds capacity.
- Gradual return to impact, jogging, cutting, jumping, once you hit certain strength and control benchmarks.
Will you get back to your old level? Most active adults do, or close to it, when they respect the early-phase rules and actually follow through on rehab, not just wait until walking is comfortable and call it done.
You don’t have to love this phase. You just have to not rush it. Follow your surgeon’s protocol, lean on a good physiotherapist, train what you can safely train, and treat weeks 0–6 like the foundation you’ll be lifting, running, and playing on for years.
You must be logged in to post a comment.